How It Works
Preseem polls Powercode for information about site equipment and accounts via an API, from the Preseem cloud. Changes in Powercode are synced to Preseem within 5 minutes.
- Network Site equipment is read into Preseem's model of (Tower, Sector).
- All Associated Equipment of each Network Site in loaded into Preseem. Any equipment with a category of Access Point, access-points or OLT creates an Access Point in Preseem.
- The Network Site Name in Powercode is used to set the Tower in Preseem.
- The Name of the equipment item in Powercode is used to set the Sector in Preseem.
- The IP Address of the equipment in Powercode is the IP address of the AP in Preseem. Preseem will attempt to SNMP poll this IP address.
- Preseem will set a 10Gbps shaper on the IP Address of all network site equipment in Powercode to prevent management traffic from being shaped to the default rate. This is only done for site equipment; there is no other way to assign IP addresses to a site in Powercode.
- Customer Account data is read into Preseem's data model.
- Each Account in Powercode is converted to a single Account and Service in Preseem. This means there is one shaper per Powercode account, and an account is linked to at most one AP in Preseem's network topology model.
- The Account ID in Preseem is the Account ID in Powercode.
- The Account Name in Preseem is the Account Name in Powercode.
- The Service assigned to the account that has an Upload Speed and Download Speed is used to set the upload and download rates for the account in Preseem.
- If the service has a Slow After Usage Exceeded pentalty, Preseem will automatically enforce this penalty.
- All Equipment assigned to each account is loaded into Preseem.
- If there is equipment of category CPE, CPE Bridge, cpe or ONU assigned to an account, the Physical Address is matched against SNMP polling data in Preseem to map the account to the network topology. If an account has multiple CPEs, Preseem tries to find the most accurate mapping.
- Each IP subnet from an account's Remote Subnets is mapped to that account in Preseem.
- The upload and download rates in Preseem will be shared by the IP Address of each equipment and all Remote Subnets of a Powercode account. CPE management IP addresses are included in the shaper.
- By default, customer equipment with category of Access Point is not treated differently from any other equipment. This behavior can be changed by Preseem on a case by case basis, so that Access Points assigned to a Powercode account are handled the same way as Network Site Access Pointes by Preseem. Contact Preseem customer support if this is required.
- Accounts that do not have a CPE equipment assigned to them will be categorized as Non-Wireless topology in Preseem.
- By default, Powercode accounts that do not have a status of Active are shaped to their regular service speed by Preseem. This behavior can be changed by Preseem on a case by case basis, so that non-active accounts are blocked. Currently this configuration can only be done by Preseem, but in the future it will be available in the Preseem web app.
- Preseem can be configured to report usage to Powercode. To avoid double-counting with other usage reporting systems, this is disabled by default. This can be enabled by Preseem on request.
- When you setup Powercode for integration with Preseem, you will create a Preseem BMU. This BMU requires an API key from Preseem. There is no other configuration required. Only one of these needs to be created. The only purpose of this BMU is to enable software features in Powercode that manage syncing state with Preseem.
Setup Instructions
Generate a Powercode API Key
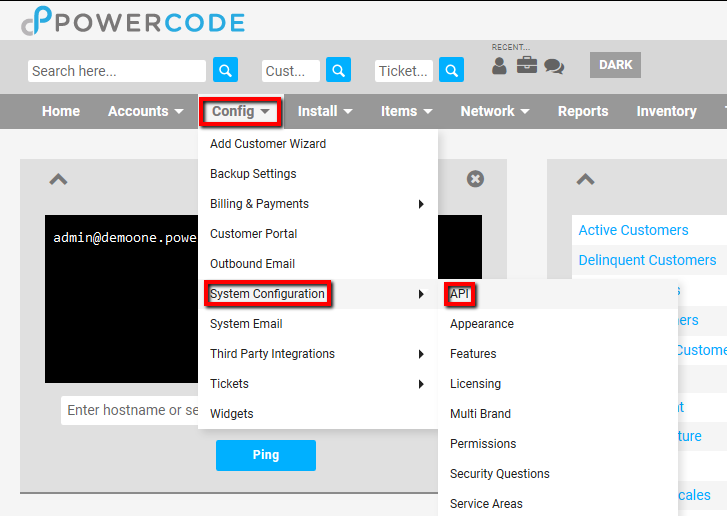
Log into Powercode as an administrative user. Under Config->System Configuration->API, click the Generate button.
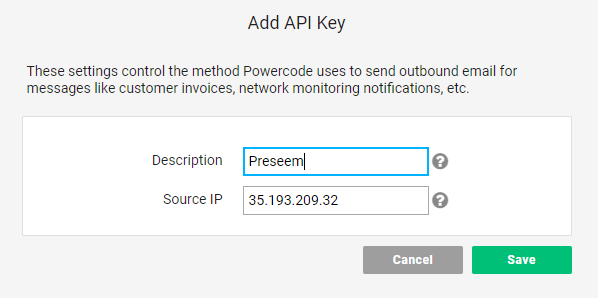
Add a description and fill in the Source IP as 35.193.209.32. Click Save.
Copy the generated API key, and send that key, along with the URL to your Powercode instance, to the Preseem support team.
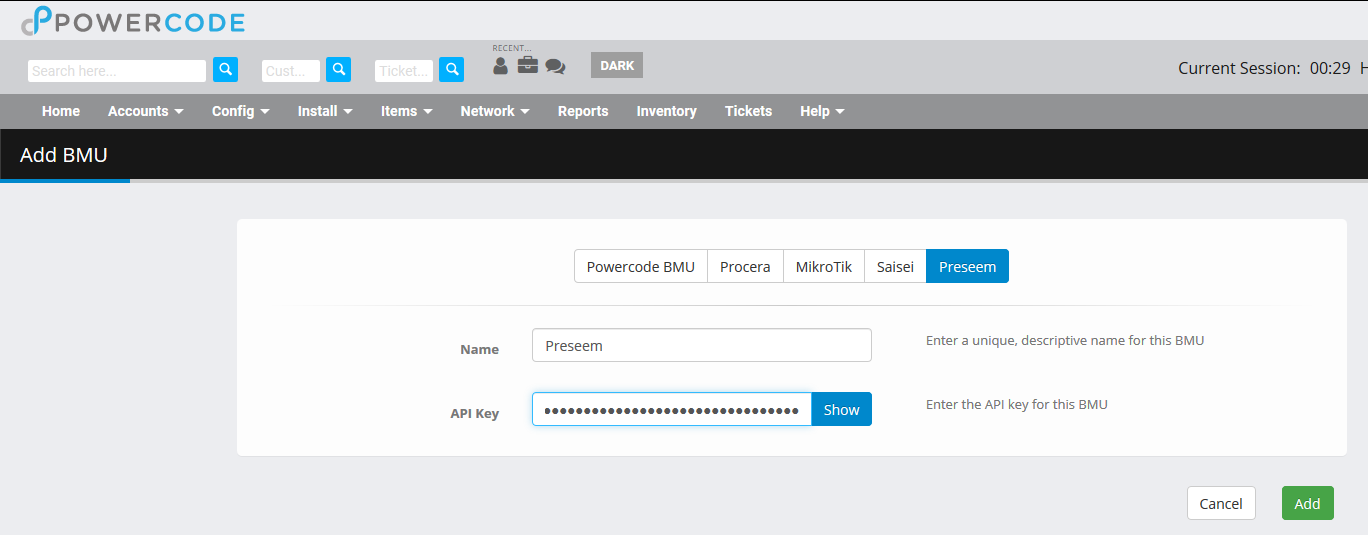
Add a Preseem BMU
The next step is to add Preseem as a BMU.
First, create a new API key in Preseem here: https://app.preseem.com/user/settings?tab=apiKeys. Use the Billing System preset. Copy the new API Key.
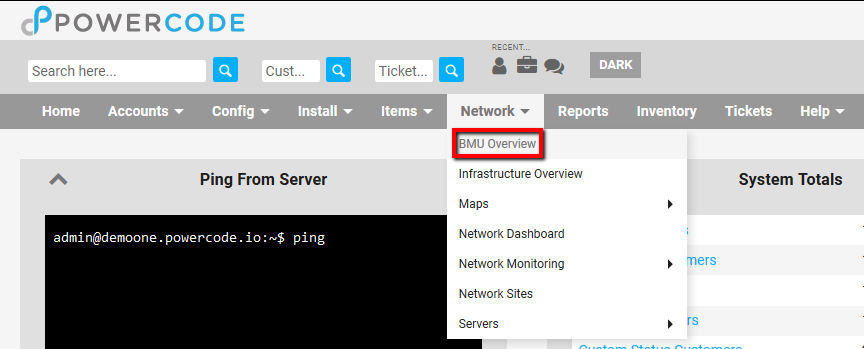
In Powercode, click the Network menu and select BMU Overview.
From the BMU Overview screen, click the "Add New BMU button and select "Preseem". Fill in a name and an API key that you have obtained from Preseem, and click the Add button. No other information is required. You do not need to add IP subnets to this BMU.
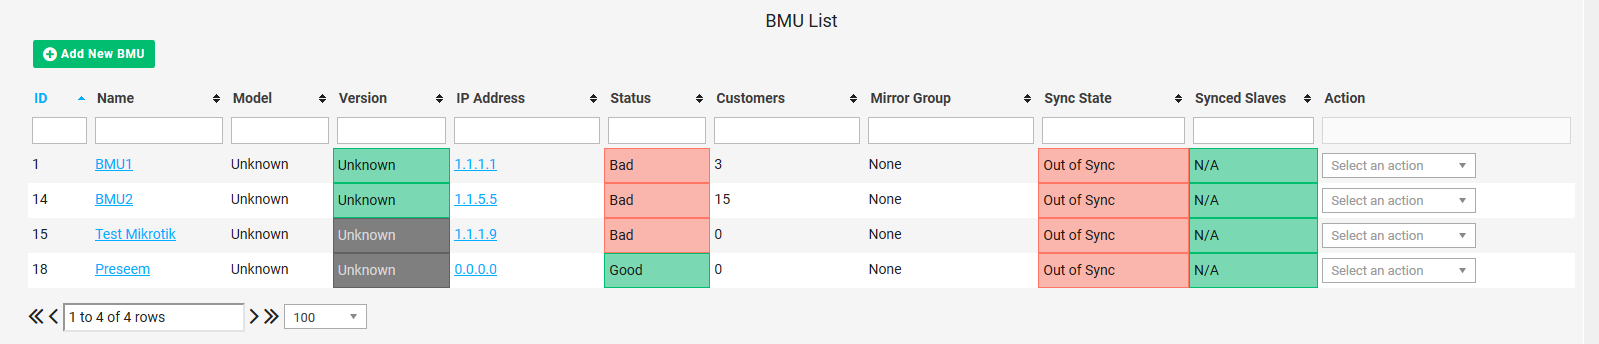
After this, you should see Preseem in the list of BMUs.